上一篇介绍了Container
这一篇我们来看看别的Widget。
Row Row 这个Widget其实就是一个布局组件,类似于前端中flex-direction: row;。作用就是可以使Row中的子元素在水平方向上面排列,可以用来做走马灯轮播等效果。
Row可以设置一下几种属性
1
2
3
4
5
6
7
8
9
10
Row({ Key key, MainAxisAlignment mainAxisAlignment = MainAxisAlignment.start, MainAxisSize mainAxisSize = MainAxisSize.max, CrossAxisAlignment crossAxisAlignment = CrossAxisAlignment.center, TextDirection textDirection, VerticalDirection verticalDirection = VerticalDirection.down, TextBaseline textBaseline, List <Widget> children = const <Widget>[], })
mainAxisAlignment 这个属性在上一节介绍Container的时候已经涉及到了,他就是设置子元素在主轴方向上面 的对其方式的。取值的话也是前端中对其方式的几种取值
start
end
center
spaceBetween
spaceAround
spaceEvenly
唯一不同的是,在Flutter中新增加了一个spaceEvenly属性,即均匀的分配空间
crossAxisAlignment 同mainAxisAlignment,不同的是他设置的是从轴方向 。取值也有一点不同
start
end
center
stretch : 垂直方向上面拉伸了
baseline
补充:上面说到了主轴从轴,那究竟是什么方向呢?以Row为例,这是一个水平方向上排列的Widget,那么他的主轴就是 horizontal(水平) ,从轴就是 vertical(垂直)。
mainAxisSize 这个设置的是主轴 的区间大小,值包含min和max两个。
textDirection 顾名思义,这个属性设置的是文字的方向,值包含
ltr : 从左往右排列
rtl : 从右往左排列
两个。或许有的朋友觉得没有,那是因为你还没有涉及到从右往左的一个排列的方式。当你遇到阿拉伯语,希伯来语等语言的时候,那这个属性就是一个神器了。关于左右布局的方案可以查看我之前写的关于网站左右布局适配 。
verticalDirection 这个也是设置文字的方向,不过我觉得这个属性可能用的更少了,值包含
up : 从上往下排列
down : 从下往上排列
textBaseline 设置文字的基线。这里的值没有前端中多。仅仅只有两个
alphabetic : 用于对齐字母字符底部的水平线。
ideographic : 用于对齐表意字符的水平线。
这个属性一般不会用到的,但是,如果你要设置 crossAxisAlignment 属性,那么可能需要设置 textBaseline 属性
children 这个属性需要牢记,这个是设置Row 子元素的属性,值是一个List集合(即数组),每一项都是一个Widget。
1
2
3
4
5
6
7
8
9
child: Column( children: <Widget>[ Center(child: CustomTitle(title: "说明" )), Text("Row是一个布局Widget,相当于是前端CSS3中弹性盒模型布局中:flex-direction: row;作用就是使内容水平方向排列。" ), Row( ) ], ),
Column 如果你掌握了Row,那么Column对你来说就是易如反掌。Row是水平方向上面排列的,而Column则是垂直方向上面排列的。这是他们之前唯一的区别,他们的属性一模一样。这里就不在做过多说明。
Image 图片Widget。
1
2
3
4
5
6
7
8
9
10
11
12
13
14
15
16
17
const Image({ Key key, @required this .image, this .semanticLabel, this .excludeFromSemantics = false , this .width, this .height, this .color, this .colorBlendMode, this .fit, this .alignment = Alignment.center, this .repeat = ImageRepeat.noRepeat, this .centerSlice, this .matchTextDirection = false , this .gaplessPlayback = false , this .filterQuality = FilterQuality.low, })
Image 必须有一个image参数,设置图片,可以是网络图片可以是本地图片。
Image.asset:用来加载本地资源图片,等同于new AssetImage
Image.file:用来加载本地(File文件)图片,等同于new FileImage
Image.network:用来加载网络图片,等同于new NetworkImage
Image.memory:用来加载Uint8List资源(byte数组)图片,等同于new MemoryImage
Image.asset(or AssetImage) 加载一个本地的资源图片 。这里的本地的图片资源指的是什么呢?即你项目中用到的图片,比如logo。注意和接下来讲到的 Image.file 区分 。
如果我们需要使用asset类的东西,需要在pubspec.yaml文件中进行配置。如果我们没有修改过初始化后的pubspec.yaml ,你会在注释中看到这样的一段注释
So。如果我们要使用图片,我们需要两个步骤:
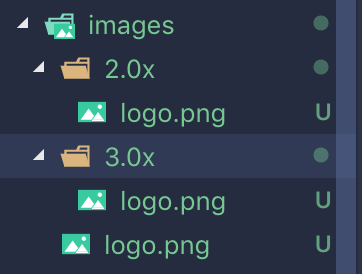
在根目录下面新建images文件夹用来存放图片,也可以是其他地方,但是更推荐在根目录中
配置pubspec.yaml
为了更好的适配图片,还是建议使用多套图片,比如images/2.0x和images/3.0x两种类型的图片
pubspec.yaml中配置如下
1 2 3 4 assets: - images/logo.png - images/2.0x/logo.png - images/3.0x/logo.png
具体使用就是AssetImage('images/logo.png)
Image.file 这个也是设置本地图片,不用于上面的asset,这个一般不会是项目中存在的图片。可以使相册中的图片或者是相机拍照的图片。
还有,你可能需要image_picker 这个插件来完成图片的选择以及拍照。这个插件IOS需要配置一下,安卓不用。
注意: 在Info.plist中设置权限的时候需要使用英文
1 2 3 4 5 6 <key > NSPhotoLibraryUsageDescription</key > <string > Use the gallery to select phonts</string > <key > NSCameraUsageDescription</key > <string > Use the camare to take phonts</string > <key > NSMicrophoneUsageDescription</key > <string > Use the Microphone to get voice</string >
Image.network 设置网络图片,使用就是直接传入一个网络图片的地址即可
1 new Image.network('/img/favicon-32x32.png' )
使用网络图的时候因为是请求的网络上面的资源,有的时候可能会出现请求失败或者是请求错误的情况,这个时候我们需要使用一个占位图或者说是加载出错显示的图片,那么需要使用到FadeInImage
占位图 1 2 3 4 5 6 FadeInImage.assetNetwork( placeholder: 'images/logo.png' , image: 'https://ss0.bdstatic.com/70cFvHSh_Q1YnxGkpoWK1HF6hhy/it/u=324769017,4079415235&fm=26&gp=0.jpg' , width: 120 , fit: BoxFit.fitWidth, )
上面代码中的placeholder属性就是站位属性,站位的图片是一个静态资源图片,你还可以设置透明的占位图。
但是我们无法设置网络图片加载出错显示的图片,这里可是使用第三方的工具cached_network_image
1 2 3 4 5 6 7 new CachedNetworkImage( width: 120 , fit: BoxFit.fitWidth, placeholder: new CircularProgressIndicator(), imageUrl: imageUrl, errorWidget: new Icon(Icons.error), )
Image.memory 加载 Uint8List 图片。用来将一个 byte 数组加载成图片,用法如下:
width<Double> and height<Double> 这里的 width 和 height 并不是设置图片的宽高,而是设置这个Image容器的宽高,用来显示图片的宽高。
1 2 3 4 5 6 7 8 9 Image( image: AssetImage('images/logo.png' ), width: 100 , height: 100 , alignment: Alignment.center, repeat: ImageRepeat.repeat, filterQuality: FilterQuality.low, )
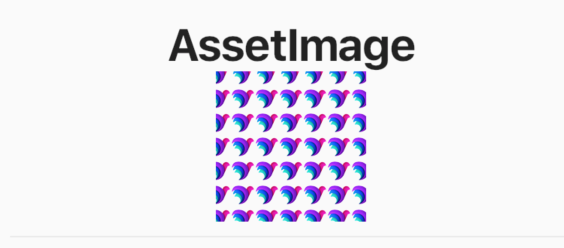
比如App上面的AssetImage 案例
上面设置的图片width 和height 。但是图片其实是很小的,因为设置了repeat(重复)属性,所以可以看到很多个小图片。如果要设置图片的宽高,可以设置了width 和height 后在设置fit:BoxFit.cover属性。
semanticLabel<String> 图像的语义描述,用于向Andoid上的TalkBack和iOS上的VoiceOver提供图像描述
talkback是一款由谷歌官方开发的系统软件,它的定位是帮助盲人或者视力有障碍的用户提供语言辅助
Voiceover功能是APPLE公司在2009年4月新推出的一种语音辅助程序
excludeFromSemantics<Bool> 是否启用图像的语义描述。
color<Colors> 颜色。设置图片的颜色,会覆盖图片原有的颜色,像是前端中的字体图标,可以指定颜色。一般会和colorBlendMode配合使用
colorBlendMode<BlendMode> 用于将color与此图像组合。
默认为BlendMode.srcIn。在混合模式方面,color是来源,此图像是目的地。
fit<FixBox> 图片如何在Image控件中显示,有以下几个值可选
1 2 3 4 5 6 7 8 9 enum BoxFit { fill, contain, cover, fitWidth, fitHeight, none, scaleDown, }
具体的效果可以查看[]
FlutterApp 案例源码
alignment 用来控制图片的对齐方式,这个属性在介绍Container 的时候已经介绍过了,如果你忘了,可以回头看看
repeat 设置图片的重复。这个属性就像是CSS中设置背景重复一样
noRepeat: 不设置重复。默认值
repeat: 重复X轴与Y轴
repeatX: 重复X轴
repeatY: 重复Y轴
Image其他的几个属性基本上都用不到。可能会用到的就是上面介绍到的,如果你有兴趣,可以自行了解。以上就是关于Image Widget的简单说明。
Text Text Widget用的是非常多的一个组件,要显示文字就需要用到这个组件。使用也是很简单的。
1 2 3 4 5 6 7 8 9 10 11 12 13 14 const Text( this .data, { Key key, this .style, this .strutStyle, this .textAlign, this .textDirection, this .locale, this .softWrap, this .overflow, this .textScaleFactor, this .maxLines, this .semanticsLabel, })
首先需要传一个data,即我们需要显示的文字。接下来就是其中的每一项属性了
textAlign 对其方式
left 左对齐
right 右对齐
center 居中
justify 两端对齐
statr 开始对齐,大部分条件下等同于 left
end 结束对齐,大部分条件下等同于 right
textDirection 文字方向,就两个值 ltr 与 rtl
locale 此属性很少设置,用于选择区域特定字形的语言环境
softWrap 某一行中文本过长,是否需要换行。默认为true,如果为false,则文本中的字形将被定位为好像存在无限的水平空间
overflow 超出文本的显示方式
TextOverflow.clip 超出部分裁剪
TextOverflow.ellipsis 超出部分显示省略号,用的更多
TextOverflow.fade 超出部分显示透明
textScaleFactor<double> 每个逻辑像素的字体像素数。有点像是把文字放大多少倍。
maxLines<int> 显示的文本的行数
semanticsLabel 图像的语义描述,用于向Andoid上的TalkBack 和iOS上的VoiceOver 提供图像描述
talkback是一款由谷歌官方开发的系统软件,它的定位是帮助盲人或者视力有障碍的用户提供语言辅助
Voiceover功能是APPLE公司在2009年4月新推出的一种语音辅助程序
style 这个属性才是用的更多的一个属性,主要是设置字体的样式,包括但不限于字体,字体大小,颜色,字体类型等。
使用的是TextStyle下面的类
1 2 3 4 5 6 7 8 9 10 11 12 13 14 15 16 17 18 19 20 21 22 23 24 const TextStyle({ this .inherit = true , this .color, this .backgroundColor, this .fontSize, this .fontWeight, this .fontStyle, this .letterSpacing, this .wordSpacing, this .textBaseline, this .height, this .locale, this .foreground, this .background, this .shadows, this .decoration, this .decorationColor, this .decorationStyle, this .decorationThickness, this .debugLabel, String fontFamily, List <String > fontFamilyFallback, String package, })
文字下划线
1 2 3 4 5 6 7 8 9 10 11 12 13 14 15 16 17 18 19 20 21 children: <Widget>[ Center(child: CustomTitle(title: "Text Widget" )), TextDemo(), Center(child: Text(text, style: TextStyle( decoration: TextDecoration.lineThrough, decorationColor: Colors.red, decorationStyle: TextDecorationStyle.dotted, fontSize: 20 , ))), Center(child: Text(text, style: TextStyle( decoration: TextDecoration.overline, decorationStyle: TextDecorationStyle.dashed, fontSize: 20 , ))), Center(child: Text(text, style: TextStyle( decoration: TextDecoration.underline, decorationStyle: TextDecorationStyle.wavy, fontSize: 20 , decorationColor: Colors.green ))), ]
大部分的文字样式
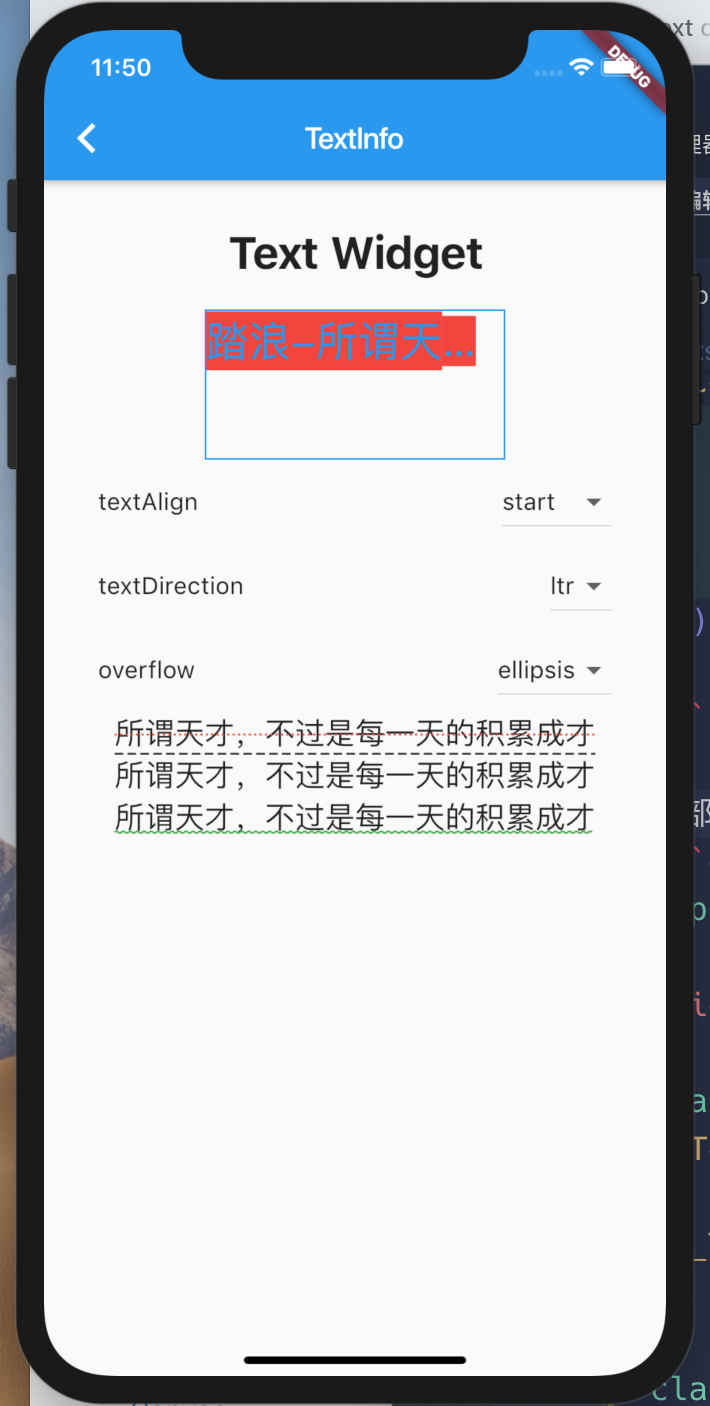
1 2 3 4 5 6 7 8 9 10 11 12 13 14 15 16 17 18 19 20 21 22 23 24 25 26 27 28 29 30 31 32 33 34 35 36 37 38 39 40 41 42 43 44 45 46 47 48 49 50 51 52 53 54 55 56 57 58 59 60 61 62 63 64 65 66 67 68 69 70 71 72 73 74 75 76 77 78 79 80 81 82 83 84 85 86 87 88 89 90 91 92 93 94 95 96 97 98 99 100 import 'package:flutter/material.dart' ;void main() => runApp(TextDemo());class TextDemo extends StatefulWidget TextDemo({Key key}) : super (key: key); _TextDemoState createState() => _TextDemoState(); } class _TextDemoState extends State <TextDemo > TextAlign _textAlign = TextAlign.left; TextDirection _textDirection = TextDirection.ltr; TextOverflow _textOverflow = TextOverflow.visible; @override Widget build(BuildContext context) { return Container( margin: EdgeInsets.only(top: 20 ), child: Column( children: <Widget>[ Container( width: 200 , height: 100 , decoration: BoxDecoration( border: Border.all( color: Colors.blue, width: 1 , style: BorderStyle.solid ) ), child: Text( '踏浪-所谓天才,不过是每一天的积累成才' , textAlign: _textAlign, textDirection: _textDirection, maxLines: 1 , overflow: _textOverflow, textScaleFactor: 2 , style: TextStyle( color: Colors.blue, backgroundColor: Colors.red ), ), ), ListTile( title: Text('textAlign' ), trailing: DropdownButton( value: _textAlign, items: TextAlign.values.map((value) => DropdownMenuItem( child: Text(value.toString().substring('TextAlign.' .length)), value: value )).toList(), onChanged: (newVal){ if ( newVal != null ){ setState(() { _textAlign = newVal; }); } }, ) ), ListTile( title: Text('textDirection' ), trailing: DropdownButton( value: _textDirection, items: TextDirection.values.map((value) => DropdownMenuItem( child: Text(value.toString().substring('TextDirection.' .length)), value: value )).toList(), onChanged: (newVal){ if ( newVal != null ){ setState(() { _textDirection = newVal; }); } }, ) ), ListTile( title: Text('overflow' ), trailing: DropdownButton( value: _textOverflow, items: TextOverflow.values.map((value) => DropdownMenuItem( child: Text(value.toString().substring('TextOverflow.' .length)), value: value )).toList(), onChanged: (newVal){ if ( newVal != null ){ setState(() { _textOverflow = newVal; }); } }, ) ) ], ), ); } }
以上就是关于Text Widget的简单介绍。
这一节就介绍这四种Widget,后续再来介绍其他的Widget。
如果你喜欢文本,请支持一下博主,谢谢。
