官方学习文档
Handbook - The TypeScript Handbook
基础类型:声明变量 布尔类型 布尔也就两种, true 或者 false
1
2
3
4
5
6
7
let isBoolean: boolean = false; function tell() { alert(isBoolean) } tell()
number 数值类型有很不止 number, bigint也是。同时值的话可以是十进制,二进制,还可以是NaN。
1
2
3
4
5
6
7
8
9
10
11
12
13
14
let num: number = 10; let decimal: number = 6; let hex: number = 0xf00d; let binary: number = 0b1010; let octal: number = 0o744; let big: bigint = 100n; let nan: number = NaN; function tell() { num--; console.log(num) } tell()
string 字符串,可以是普通字符串,还可以是模板字符串
1
2
3
let fullName: string = `Bob Bobbington`; let age: number = 37; let sentence: string = `Hello, my name is ${fullName}.
array 1 2 3 let arr:number[] = [1, 2, 3]; // 等同于 let arr:Array<number> = [1, 2, 3];
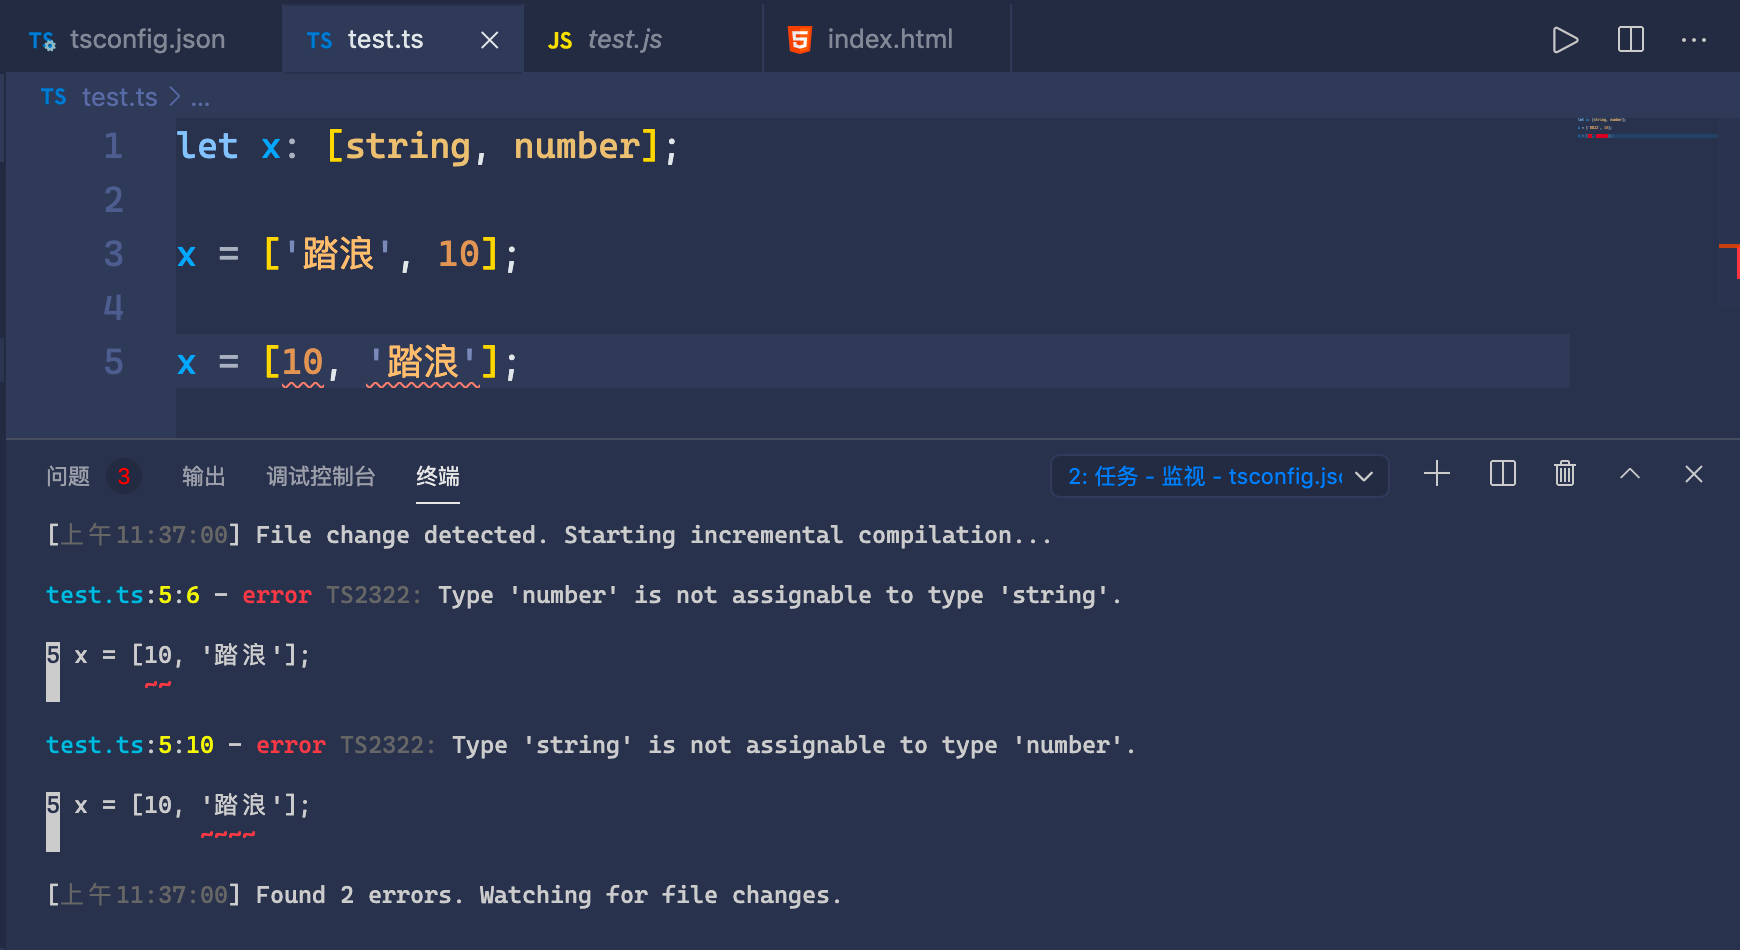
Tuple 元组 元组看成是数组的升级版,可以先 定义数组里面的每一项的数据类型,在赋值。
1 2 3 4 let x: [string, number]; x = ['踏浪', 18]; // OK x = [18, '踏浪']; // Error
要求每一项的数据类型都和定义的类型一致,否则就会报错
同时,也不能在 x 中添加第三项,因为没有定义
1 2 3 Tuple type '[string, number]' of length '2' has no element at index '3'. 7 x[3] = 100;
枚举 Enum 枚举类型将值限定在一定的范围内,比如一周只有7天,一年只有12个月
1 2 3 4 5 6 7 8 9 10 11 12 13 14 enum Color {Red, Green, Yellow, Blue}; enum Color2 {Red = 10, Green, Yellow = 30, Blue = 20}; let colorName: string = Color[1]; // 类似数组获取下标 let color2Name: string = Color2[11]; // 自定义下标顺序 function tell() { console.log(colorName); // Green console.log(color2Name); // Green console.log(Color2[30]); // Yellow 没有固定顺序的定义 console.log(Color2[20]); // Blue 没有固定顺序的定义 } tell();
Any 任意类型 1 2 3 4 5 6 7 8 9 let a: any = 10; a = "踏浪"; a = true; a = function() {}; a = [1, 2, 3]
定义 any 类型后,就有点像是普通的js了,可以任意修改值类型
void 函数返回值声明,函数不需要任何返回值 1 2 3 4 5 6 7 8 9 10 11 function tell(): number { return 18; } function say(): string { return '踏浪' } function other(): void { return 100; //Error, Type 'number' is not assignable to type 'void'. }
使用了 void 就不要有返回值了
Null 和 undefined 唯一的 null 和 undefined
1 2 let u: undefined = undefined; let n: null = null;
Object 对象 Object是代表非基本类型的类型,即不是数字,字符串,布尔值,bigint,symbol,null或者undefined的任何类型。
1 2 3 4 5 declare function create(o: object): void; create({name: '踏浪'}); create([1, 2, 3]); create(10); // Argument of type 'number' is not assignable to parameter of type 'object'.
除了上述的这些类型,基本类型还有 Unknown Never 等,这些可以去上面提到的官网查看。
函数 在TS中函数也有具名函数与匿名函数之分,只是相对TS中,函数的参数以及返回值都可以指定参数类型
1 2 3 function add(x: number, y: number): number { return x + y; }
上面的代码参数与函数返回值的类型都是 number
如果是匿名函数
1 2 3 let sayName = function(x: string, y: number): string { return `我是${x}, ${y}岁`; }
上面的函数如果不看返回值,要想知道 x 与 y 的意义是很难的,所以,针对于匿名函数,还有一种方式,可以指定参数的具体的意义
1 2 3 let sayName: (name: string, age: number) => string = function(x: string, y: number): string { return `我是${x}, ${y}岁`; }
前面的 (name: string, age: number) 指的就是函数的参数意义, x 表示 name , y 表示 age ,后面的 =>string 则是指定函数的返回值为 string 类型的。
虽然
可选参数与默认参数 1 2 3 4 function sayName(firstName: string, lastName: string): string { return `${firstName} ${lastName}` } sayName('踏', '浪');
上面的函数接收两个参数,在TS中如果多传递 或者少传递 参数编译都不会通过,必须传递两个。但是如果我只传递一个参数呢?TS中有一个可选参数,用 ?: 表示
1 2 3 4 5 6 7 function sayName(firstName: string, lastName?: string): string { return lastName ? `${firstName} ${lastName}` : firstName } sayName('踏', '浪'); sayName('踏');
还可以设置默认值,有点像是JS中的默认值
1 2 3 4 5 6 function sayName(firstName: string, lastName = "浪"): string { return lastName ? `${firstName} ${lastName}` : firstName } sayName('踏'); // 踏 浪 sayName('踏', '❄️'); // 踏 ❄️
剩余参数 与JS中的 ... 一样,只是可以指定类型
1 2 3 function buildName(firstName: string, ...restOfName: string[]) { return firstName + " " + restOfName.join(" "); }
类 classes 基本写法
1 2 3 4 5 6 7 8 9 10 11 12 13 class Person { name: string; age: number; constructor(name: string, age: number) { this.name = name; this.age = age; } say() { return `${this.name}: ${this.age}`; } } let person = new Person();
上面的代码会有错误 error TS2554: Expected 2 arguments, but got 0.
因为上面我们使用了 constructor ,所以在创建实例的时候必须传 递两个参数才可以。
1 let person = new Person('踏浪', 18);
注意参数类型需要与你的类的 constructor 参数的类型相同。
类的继承 继承是用 extends 关键字
1 2 3 4 5 6 7 8 9 10 11 12 13 14 15 16 17 18 19 20 21 22 23 class Person { name: string; age: number; constructor(name: string, age: number) { this.name = name; this.age = age; } say() { return `${this.name}: ${this.age}`; } } class Student extends Person { school: string; constructor(school: string) { this.school = school; } tell() { return `${this.say()} ${this.school}` } } let person = new Person('踏浪', 18);
上面的 Student 类就是继承于父类 Person 的。但是如果你使用带有提示的编辑器,就会发现有错。错误如下:
错误中提示我们必须要有一个 super 。那么super接收什么参数呢。接收父类 constructor 需要的参数,这一点与ES6中的class继承一节的内容相似。可以看看
ES6 入门教程
如果子类不调用super方法,就无法得到this对象。
1 2 3 4 5 6 ... constructor(school: string) { super('踏浪', 18); this.school = school; } ...
这样就行了。
super 如果是在子类的 constructor 中调用,那么相当于是调用父类的 constructor 方法。如果是在其他非constructor 的地方,就表示一个指向父级的对象,相当于 this 。比如上面代码中的 this.say() 就可以写成 super.say() 。
1 2 3 tell() { return `${super.say()} ${this.school}` }
访问修饰符 访问修饰符有两个 public(默认) 与 private 。
1 2 3 4 5 6 7 8 9 10 11 12 13 14 15 16 17 18 19 20 21 22 23 24 25 26 class Person { public name: string; private age: number; constructor(name: string, age: number) { this.name = name; this.age = age; } private say() { return `${this.name}: ${this.age}`; } } class Student extends Person { school: string; constructor(school: string) { super('踏浪', 18); this.school = school; } tell() { return `${super.say()} ${this.school}` } } let person = new Person('踏浪', 18); let student = new Student('北大'); console.log(student.tell());
上面的代码编译会出错。我们在父类的 name age 和 say 属性与方法前面添加了访问修饰符,子类调用 super.say() 方法出错 Property 'say' is private and only accessible within class 'Person'.
所以,属性或者方法前面添加private 后子类无法访问,不影响父类自己使用,如果父类 say 方法中的 this.age 。
通过 getter setter 访问,修改私有属性 1 2 3 4 5 6 7 8 9 10 11 12 13 14 15 16 class Hello { private _name: string; say() { return `I am ${this._name}`; } get name() { return this._name; } set name(newName: string) { this._name = newName; } } let hello = new Hello(); hello.name = "踏浪"; console.log(hello.say())
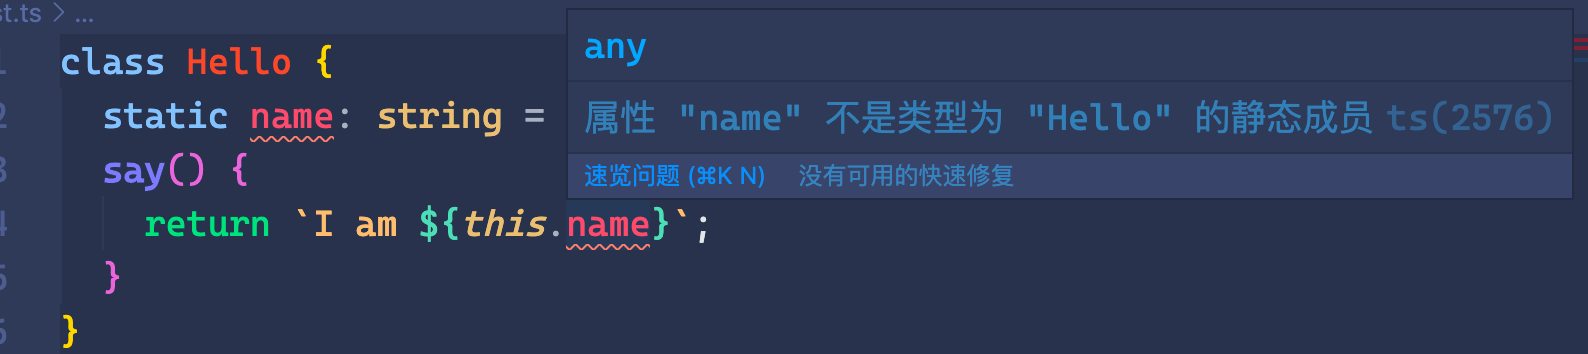
静态属性 static static 也是添加在属性或者方法前面的,如下
1 2 3 4 5 6 class Hello { static name: string = "踏浪"; say() { return `I am ${this.name}`; } }
上面一段代码会出错
name 是静态成员,不同通过 [this.name](http://this.name) 访问,需要使用类调用
1 2 3 4 5 6 class Hello { static name: string = "踏浪"; say() { return `I am ${Hello.name}`; } }
接口 Interface 先来看一段代码
1 2 3 4 5 6 function sayPersonName(person: {name: string}) { console.log(person.name); } let person = { name: '踏浪', age: 18 }; sayPersonName(person);
上面代码中 sayPersonName 的参数接收一个对象,对象的 name 属性是 string 类型的。这只是一个简单的例子,但是如果对象有很多的属性,每个属性都有各自的类型指定。那么按照上面的写法写出来的代码看着就不舒服,所以,有了接口的概念。
使用 interface 关键字来定义一个接口
1 2 3 4 5 6 7 8 9 10 11 12 13 14 15 16 17 interface person { name: string; age: number; ID: number; } function sayPersonName(person: person) { console.log(`I am ${person.name}, ${person.age} years old, ID is ${person.ID}`); } let person = { name: 'Talang', age: 18, ID: 10000 }; sayPersonName(person);
上面就是使用接口的例子,例子中有多个 person ,希望你能明报每个 person 所代表的含义。
第一个 interface 的 person 是定义的一个 person 接口,指定一个对象以及对象每个属性的类型。
第二个是 sayPersonName 中的两个 person ,第一个是指函数接收的形式参数,第二个是形式参数的类型,就是上面使用 interface 定义个接口类型。
第三个是 let 声明的 person 变量。
第四个是函数sayPersonName 调用传递的 let 定义的这个对象。
这就是接口的最基本的使用。定义的接口的属性,在传递参数的时候需要全部都要确定。如果你试过声明 person 的时候不传递某个属性,就会出错。那么有什么方法改善呢。这就需要用到可选属性了。
可选属性 1 2 3 4 5 6 7 8 9 10 11 12 13 14 15 16 17 interface person { name: string; age: number; ID: number; } function sayPersonName(person: person) { console.log(`I am ${person.name}, ${person.age} years old`); } let person = { name: 'Talang', age: 18, // ID: 10000 }; sayPersonName(person);
上面的代码编译的时候会出错 Property 'ID' is missing in type '{ name: string; age: number; }' but required in type 'person'.
前面讲函数参数的时候涉及到可选参数,使用 ?: 的形式表示的,其实,这里也是一样的。
1 2 3 4 5 6 interface person { name: string; age: number; ID?: number; } ...
这样定义就不会出错了
函数接口的定义 1 2 3 4 5 6 7 interface SearchFunction { (keyword: string, page: number): string; } let mySearch: SearchFunction = function(keyword: string, page: number) { return page > 10 ? keyword : 'false'; }
(keyword: string, page: number): string; 就是定义的函数的类型,参数以及返回值。
数组类型 1 2 3 4 5 interface stringArray { [index: number]: string } let arr: stringArray = ['10', '10'];
数组的每一项都要是 string 类型的。
类的接口 声明类的时候要使用定义的接口需要使用 implements 关键字,声明的类中的属性需要有接口中的参数
1 2 3 4 5 6 7 8 interface ClockInterface { currentTime: Date; } class Clock implements ClockInterface { currentTime: Date = new Date(); constructor(h: number, m: number) {} }
接口混合,继承 接口也是可以继承的
1 2 3 4 5 6 7 8 9 10 11 12 13 14 15 16 17 18 19 20 21 22 23 24 25 26 27 28 29 interface Color { color: string; } interface Shape { shape: string; } interface Pos { x: number; y: number; } interface Box extends Color, Shape { // 继承多个使用 , 隔开 position: Pos; size: number; } let position: Pos = { x: 100, y: 100 } let box: Box; box = { color: "red", shape: "circle", position: position, size: 100 };
泛型 1 2 3 function Hello(num: number): number { return num; }
上面定义了一个函数 Hello 。参数与返回值都是 number 。但是如果我要修改为 string 或者其他类型。那就需要重新写一个函数。
你或许认为可以使用 any 类型,但是如果使用 any 那么就失去了类型规范与校验的功能。所以这时候就需要用到泛型了。
1 2 3 function Hello<T>(arg: T):T { return arg; }
泛型的写法 <T> 中间的大写字母为 T 是约定俗成的。
上面的函数在声明的时候使用了泛型,在使用的时候在指定具体的类型。
1 let output = Hello<string>('踏浪');
<> 中的类型与参数的类型需要一致,因为声明的函数类型是一样的。当然,在定义函数的时候,参数、返回值也可以是其他的类型。
泛型类型 1 2 3 4 5 6 7 8 9 10 11 12 function Hello<T>(arg: T):T { return arg; } let myHello: <T>(arg: T) => T = Hello; console.log(myHello<string>("Hello")); let myHello2: {<T>(arg: T):T} = Hello; console.log(myHello2<string>("Hello2")); let myHello3 = Hello; console.log(myHello3(10))
上面三种写法都可以,但是前两种会对新的函数做出类型检查,但是第三个函数确实不会的,直接传递也能编译成功,只是相当于执行了Hello函数而不做类型检查。
上面的前两个声明,我们可以定义一个接口
1 2 3 interface Hello<T> { (arg: T): T; }
或者这样写也是可以的
1 2 3 interface Hello { <T>(arg: T): T; }
泛型类 1 2 3 4 5 6 7 8 9 10 class Hello<T> { name: T; say: (name: T) => T; constructor(name: T, say: (name: T) => T) { this.name = name; this.say = say; } } let hello = new Hello<string>("踏浪", () => "hello");
Modules TS中的模块与ES6中的模块差不多,可以看
Handbook - Modules
ES6 入门教程
需要关注的一点就是在TS中的通配符声明
1 2 3 4 5 6 7 8 9 10 11 12 13 14 15 16 17 18 19 declare module '*.gif' { const content: any export default content } declare module '*.png' { const content: any export default content } declare module '*.svg' { const content: any export default content } declare module '*.ttf' { const content: any export default content }
这种声明允许在 TS 中 import 非 JavaScript 文件。
namespace 命名空间就像是声明一个对象,对象中还有其他属性,可以通过 . 操作符获取属性
1 2 3 4 5 6 7 8 9 10 11 12 13 14 15 16 17 18 19 20 21 declare namespace Person { export interface Name { name: string; } export interface Age { age: number; } export class Color { color: string; } interface Address { address: string; } interface Id { id: number; } }
使用的话可以直接 [Person.Name](http://person.Name) 来使用。在项目中,放在 .d.ts 文件中默认全局。如果没有使用 declare 关键字,需要手动 export 。
装饰器 装饰器就是在不调用函数的情况下执行函数。装饰器只能装饰类以及类的方法,属性
1
2
3
4
5
6
function hello() { console.log('hello'); } @hello class Hello {}
上面的 @hello 就是一个装饰器,放在 class Hello 上面,是对 Hello 类的装饰。你还可以对属性,方法进行装饰,只需要放在那一行的上面即可。如果是一行,放在这一行的前面即可。
类的装饰 类的装饰,装饰器只能接收一个参数,参数指向这个类
1 2 3 4 5 6 7 8 9 10 @testable class MyTestableClass { // ... } function testable(target) { target.isTestable = true; } MyTestableClass.isTestable // true
上面的装饰器为 MyTestableClass 类添加了一个静态 属性 isTestable ,且值固定为 true 。那我可以手动的传递参数么?可以的。
1 2 3 4 5 6 7 8 9 10 11 12 @testable(true) class MyTestableClass { // ... } function testable(isTestable) { return function (target) { target.isTestable = isTestable }; } MyTestableClass.isTestable // true
方法的装饰 方法的装饰接收三个参数。装饰器第一个参数是类的原型对象,第二个参数是所要装饰的属性名,第三个参数是该属性的描述对象。
1 2 3 4 5 6 7 8 9 10 11 12 13 14 15 16 17 18 19 20 class Person { @readonly name() { return `${this.first} ${this.last}` } } function readonly(target, propertyKey, descriptor){ // descriptor对象原来的值如下 // { // value: specifiedFunction, // enumerable: false, // configurable: true, // writable: true // }; descriptor.writable = false; return descriptor; } readonly(Person.prototype, 'name', descriptor); // 类似于 Object.defineProperty(Person.prototype, 'name', descriptor);
访问器装饰 对于类的 getter 与 setter 也是可以进行装饰的,使用方法与类的方法的装饰一样
1 2 3 4 5 6 7 8 9 10 11 12 13 14 15 16 17 18 19 20 21 22 23 24 25 26 27 28 class Point { private _x: number; private _y: number; constructor(x: number, y: number) { this._x = x; this._y = y; } @configurable(false) get x() { return this._x; } @configurable(false) get y() { return this._y; } } function configurable(value: boolean) { return function ( target: any, propertyKey: string, descriptor: PropertyDescriptor ) { descriptor.configurable = value; }; }
属性的装饰 属性的装饰一般很少用到。可以看看
Handbook - Decorators
ES6中也有装饰器的概念
ES6 入门教程
Mixins 1 2 3 4 5 6 7 8 9 10 11 12 13 14 15 16 17 18 19 20 21 22 23 24 25 26 27 28 29 30 31 32 33 34 35 36 37 38 39 40 41 42 43 44 45 46 47 48 49 50 51 52 53 54 // Disposable Mixin class Disposable { isDisposed: boolean; dispose() { this.isDisposed = true; } } // Activatable Mixin class Activatable { isActive: boolean; activate() { this.isActive = true; } deactivate() { this.isActive = false; } } // 因为用implements,需要在子类里实现所有接口定义。非常繁琐 class SmartObject implements Disposable, Activatable { constructor() { setInterval(() => console.log(this.isActive + " : " + this.isDisposed), 500); } interact() { this.activate(); } // Disposable isDisposed: boolean = false; dispose: () => void; // Activatable isActive: boolean = false; activate: () => void; deactivate: () => void; } applyMixins(SmartObject, [Disposable, Activatable]); let smartObj = new SmartObject(); setTimeout(() => smartObj.interact(), 1000); //////////////////////////////////////// // In your runtime library somewhere //////////////////////////////////////// function applyMixins(derivedCtor: any, baseCtors: any[]) { baseCtors.forEach(baseCtor => { Object.getOwnPropertyNames(baseCtor.prototype).forEach(name => { derivedCtor.prototype[name] = baseCtor.prototype[name]; }); }); }
关键点在于 implements 的 SmartObject 中的部分属性只是占位没有具体实现,而是通过 Mixins 而混合而成。相当于一直继承的简写。
以上就是关于TS中常用到的,部分例子来自于官网,这里只是学习总结,以加深印象,方便查阅。
更新于2021-6-10 typescript帮助类型 ts中提供了一些好用的帮助类,可以大大提供我们的工作效率。
Partial 1 2 3 4 5 6 type Partial<T> = { [P in keyof T]?: T[P]; };
这个工具接受一个类型并返回一个类型。作用就是将传入类型中的所有参数都变成可选的。
上面又一个 P in keyof T 。看着这个有没有熟悉?像是 for…in 循环。没错。这就是 TS 中的 for…in 。遍历范型 T 中的属性命名为 P, T[P] 就是取值(TS中的值就是类型 string | number | …)。
Pick 1 2 3 4 5 6 type Pick<T, K extends keyof T> = { [P in K]: T[P]; };
接收两个参数,第一个是一个范型 T ,第二个是 T 中的属性,T中不存在这个属性,那么就会报错
1 2 3 4 5 6 7 8 9 10 11 interface Animal { name: string age: number address: string id: number } type Data1 = Pick<Animal, 'name' >type Data2 = Pick<Animal, 'name' | 'age' >
最后返回的是一个保护第二个参数的属性的类型。就有点像是从一个类型中选择一个或者个几个属性出来
Exclude 1 2 3 4 type Exclude<T, U> = T extends U ? never : T;
表示如果 T 是 U 的子类返回never类型,如果不是返回T类型。
Omit 1 2 3 4 type Omit<T, K extends keyof any > = Pick<T, Exclude<keyof T, K>>;
Omit 与 Pick 恰恰相反。 Pick 是选择你指定的属性,而 Omit 则是选择的你写的属性之外的属性
1 2 3 4 5 6 7 8 9 10 11 12 13 14 interface Animal { name: string age: number address: string id: number } interface Cat { name: string age: number } type Data = Omit<Animal, 'name' | 'age' >
常用的就是这些,很有一些其他的属性。可以参见 https://www.typescriptlang.org/docs/handbook/utility-types.html
查看 TS 文档建议去官网 ,而不是中文翻译网站