日期时间选择
Flutter自带的 showDatePicker 和 showTimePicker 两个方法可以进行时间和日期的选择。
使用的时候直接使用者两个方法即可,不过有一点需要注意:在使用的时候,一般不要在 onPress 下直接调用,而是需要单独写一个方法。同时,因为这两个方法是异步实现的,所以,这里使用了ES8中的 async...await
下面我们来看看具体的代码实现
1
2
3
4
5
6
7
8
9
10
11
12
13
14
15
16
17
18
19
20
21
22
23
24
25
26
| var _chooseDate;
var _chooseTime;
_showDatePicker() async {
var date = await showDatePicker(
context: context,
initialDate: DateTime.now(),
firstDate: DateTime(1970),
lastDate: DateTime(2050)
);
setState((){
this._chooseDate = date.toString().split(" ")[0];
});
}
_showTimePicker() async {
var time = await showTimePicker(
context: context,
initialTime: TimeOfDay.now()
);
print(time);
setState(() {
this._chooseTime = time.toString().split("TimeOfDay(")[1].split(")")[0];
});
}
|

选择时间日期还是挺简单的,不过需要注意的是
1
2
| flutter: 选择的日期是:2019-07-30 00:00:00.000
flutter: 选择的时间是:TimeOfDay(21:34)
|
两个方法选择时间,日期后,时间日期的格式是上面那样的,如果你要使用,或许你需要处理一下。
选择时间是使用的 TimeOfDay,选择日期使用的是 DateTime ,两个是不同的方法,没有选择日期又选择时间的,或许在dart.pub上面有一些第三方的插件可以。
输入框 TextField
TextField 是Flutter中的用户输入框,属性挺多的,不同的配置出不同的效果,就像是HTML中的 input 一样。
1
2
3
4
5
6
7
8
9
10
11
12
13
14
15
16
17
18
19
20
21
22
23
24
25
26
27
28
29
30
31
32
33
34
35
36
| const TextField({
Key key,
this.controller,
this.focusNode,
this.decoration = const InputDecoration(),
TextInputType keyboardType,
this.textInputAction,
this.textCapitalization = TextCapitalization.none,
this.style,
this.strutStyle,
this.textAlign = TextAlign.start,
this.textDirection,
this.autofocus = false,
this.obscureText = false,
this.autocorrect = true,
this.maxLines = 1,
this.minLines,
this.expands = false,
this.maxLength,
this.maxLengthEnforced = true,
this.onChanged,
this.onEditingComplete,
this.onSubmitted,
this.inputFormatters,
this.enabled,
this.cursorWidth = 2.0,
this.cursorRadius,
this.cursorColor,
this.keyboardAppearance,
this.scrollPadding = const EdgeInsets.all(20.0),
this.dragStartBehavior = DragStartBehavior.start,
this.enableInteractiveSelection,
this.onTap,
this.buildCounter,
this.scrollPhysics,
})
|
TextField最简单的使用方法就是无参数调用,你可以看到上面的参数,没有一个参数是必传的。但是,没有经过修饰的输入框真的好丑。

但是问题来了,我们只是输入,但是我们怎么获取到输入的值呢?这时候就需要用到 controller 属性,也难怪会排在最前面。
两种方法
使用 controller 进行监听
1
2
3
4
5
6
7
8
9
10
11
12
13
14
15
16
17
18
19
20
21
22
23
24
25
26
27
28
29
30
| class _GetInputValueState extends State<GetInputValue> {
var _controllerValue;
@override
Widget build(BuildContext context) {
TextEditingController controller = TextEditingController();
controller.addListener((){
print(controller.text);
});
return Container(
child: Column(
children: <Widget>[
TextField(
controller: controller,
),
TextField(
onChanged: (text){
setState(() {
_controllerValue = text;
});
},
),
Text(_controllerValue == null ? "输入框没有值" : _controllerValue),
],
),
);
}
}
|
这种方法有几个问题需要注意:
- 用于常用的获取值与赋值的操作
- 在使用
controller.addListener 的时候,我无法在里面设置 setState 方法修改状态,或者说是达不到预期的效果。因为如果在 controller.addListener 里面设置了 setState 方法,每一次状态值都会更新两次,第一次是输入的值,第二次则是清空的值。所以,如果要使用这种方式,那么你可能是要直接处理这个值,用于搜索接口的调用,而不是进行数据绑定。
使用 onChange 方法
同样是上面的代码,我把它提取出来
1
2
3
4
5
6
7
| TextField(
onChanged: (text){
setState(() {
_controllerValue = text;
});
},
),
|
这样的好处就是我可以获取数据并且能够进行数据双向绑定。
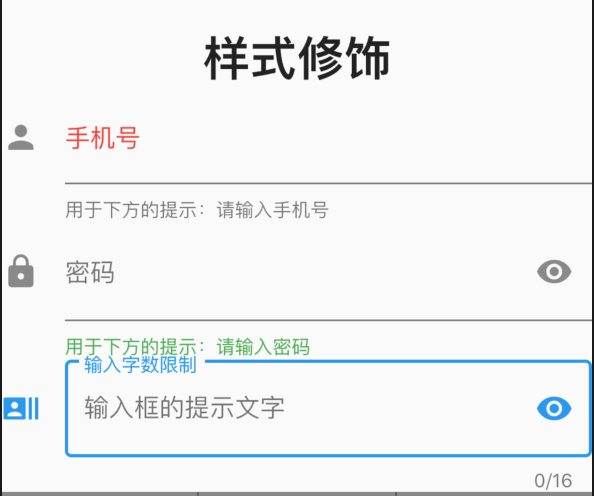
decoration 用于对输入框进行样式修饰,这个属性很重要,下面图中的修饰都是使用了 decoration

我们来看看源码
1
2
3
4
5
6
7
8
9
10
11
12
13
14
15
16
17
18
19
20
21
22
23
24
25
26
27
28
29
30
31
32
33
34
35
36
37
38
39
40
41
42
43
44
45
46
47
48
49
50
51
52
53
54
55
56
57
58
59
60
61
62
63
64
65
66
67
68
69
70
71
72
73
74
75
76
77
78
79
80
81
82
83
84
85
| import 'package:flutter/material.dart';
import 'package:fluttertoast/fluttertoast.dart';
void main() => runApp(InuptStyle());
class InuptStyle extends StatefulWidget {
InuptStyle({Key key}) : super(key: key);
_InuptStyleState createState() => _InuptStyleState();
}
class _InuptStyleState extends State<InuptStyle> {
var _inputLength = 0;
var _maxWords = 16;
@override
Widget build(BuildContext context) {
return Container(
child: Column(
children: <Widget>[
TextField(
decoration: InputDecoration(
icon: Icon(Icons.person),
labelText: '手机号',
labelStyle: TextStyle(
color: Colors.red
),
helperText: "用于下方的提示:请输入手机号",
prefixText: "+86"
),
textInputAction: TextInputAction.next,
keyboardType: TextInputType.phone
),
TextField(
decoration: InputDecoration(
icon: Icon(Icons.lock),
labelText: '密码',
helperText: "用于下方的提示:请输入密码",
helperStyle: TextStyle(
color: Colors.green
),
hintText: "输入框的提示文字",
suffixIcon: Icon(Icons.remove_red_eye)
),
keyboardType: TextInputType.text
),
TextField(
decoration: InputDecoration(
border: OutlineInputBorder(
borderSide: BorderSide(
color: Colors.red,
width: 10
)
),
icon: Icon(Icons.recent_actors),
labelText: '输入字数限制',
hintText: "输入框的提示文字",
suffixIcon: Icon(Icons.remove_red_eye),
counterText: "$_inputLength/$_maxWords"
),
maxLength: _maxWords,
onChanged: (text){
if( text.length > 16 ){
Fluttertoast.showToast(
msg: "输入超出长度限制"
);
} else {
setState(() {
_inputLength = text.length;
});
}
},
keyboardType: TextInputType.text
)
],
),
);
}
}
|
具体的说明就不多说了,常用的属性也就是上面涉及到的属性
关于 TextField 的其他的属性,可以自己尝试一下,比如自动聚焦,光标设置等等,在最上面的属性列表中都有注释,可以自行研究。
最近工作有点忙,加上要准备自考了,没有太多时间来写博客写文章,或者说很多东西可能没有涉及到,讲的不是很清楚,欢迎在下方留言,有时间我们一起探讨。


